
Table of contents
Table of contents

If you want a full understanding of how home electrical systems work, start with the safety overview: 🔹 “Home Electrical Safety Guide: Panels, Breakers, Grounding, AFCI/GFCI, and Common Faults”
Once you know the big picture, this article becomes much easier to follow.
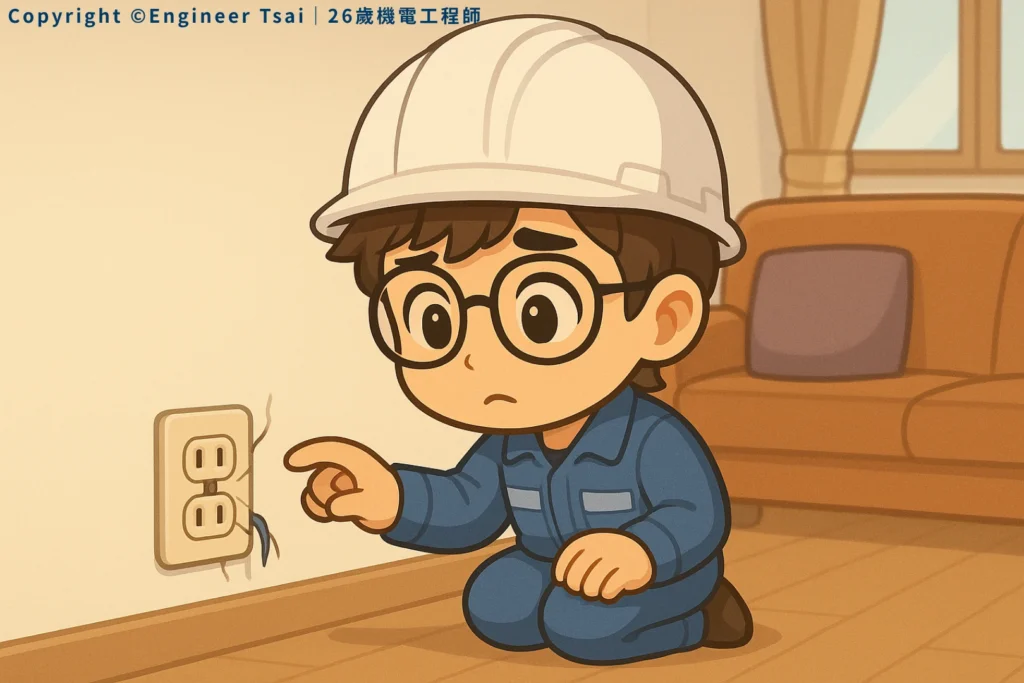
Have you ever plugged something in and felt the whole outlet move with the plug? The faceplate wiggles, the outlet feels loose in the wall, and it does not feel secure at all. That loose wall outlet feeling is your first warning sign that something needs attention.
Every time you unplug a charger or appliance, you worry that the entire outlet might pop out of the wall. Sometimes you can even see a bit of wire behind the plate and wonder, “Is this actually safe?” If that sounds familiar, this guide is for you: a simple, practical walkthrough on how to fix a loose wall outlet safely.
You are not alone. Many households and renters run into this exact problem: a loose wall outlet that looks like a small annoyance but can turn into a real safety issue.
A loose outlet is more than just ugly. Over time it can lead to overheating, arcing (tiny sparks), tripped breakers, and in the worst cases, shock or fire hazards. Treating a loose wall outlet as a real safety issue is one of the easiest upgrades you can make to your home.
The good news: learning how to safely secure or replace a slightly loose outlet is not that hard.
As long as you respect safety rules and turn the power off properly, many “mildly loose outlet” situations can be handled as a DIY project. You save money, learn a new skill, and make your home safer at the same time.
Why Do Wall Outlets Come Loose?
- In many homes, people plug and unplug high-power devices all the time: space heaters, hair dryers, vacuums, chargers, and more. That constant pushing and pulling puts stress on the outlet and its mounting screws, and over the years the outlet gradually loosens until you end up with a loose wall outlet.
- Sometimes the electrical box behind the outlet was never mounted firmly, or the screws that hold the outlet to the box were not tightened properly during construction or a past remodel.
- In older houses, plastic parts and metal straps simply age. Cover plates crack, boxes shift slightly, and older materials no longer hold everything as tightly as they used to, so the outlet starts to wiggle and become a visibly loose wall outlet.
The main point:
Once you notice a loose wall outlet, do not just ignore it and hope it stays “good enough.” The looser it gets, the more likely the internal connections can overheat, arc, or fail.
Quick Safety Check: Is Your Loose Outlet Still Safe to Use?
Before you grab a screwdriver, do a quick safety check to see how serious this loose outlet or loose wall outlet problem really is.
1️⃣ Does the outlet move or show gaps?
Plug something in and gently move the plug up, down, left, and right. Does the outlet and faceplate move with it? Do you see a visible gap between the cover plate and the wall?
2️⃣ Any strange sounds, sparks, or burning smell?
If you hear crackling or popping sounds, see small sparks, or smell something burnt when using the outlet, this is more than just a loose box. It usually means the internal connections may already be overheating or arcing.
3️⃣ Any visible bare wire or damaged insulation?
If you can see exposed copper, cracked insulation, or a cover plate that is about to fall off, stop using that outlet immediately.
Key idea:
“Loose outlet? Do not panic, but do not ignore it either.” First, decide whether it is a mildly loose mounting issue or a deeper problem with burnt wires or failing connections. Mild movement is more suitable for DIY. Burnt marks or melted parts should be left to a professional.
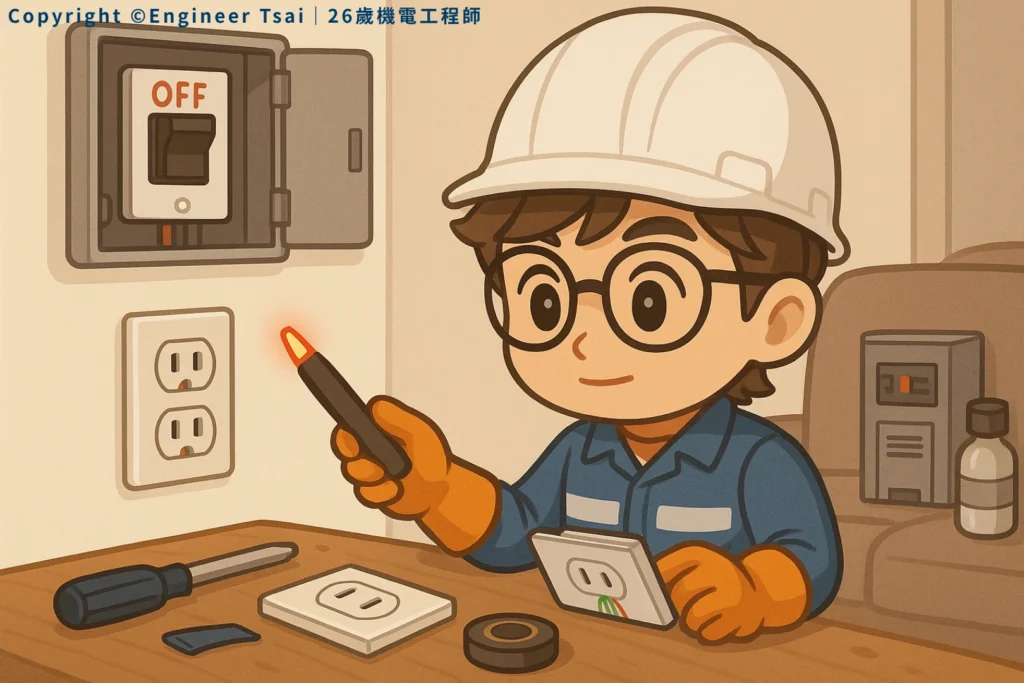
Step Zero: Turn the Power Off (Non-Negotiable)
Whenever you are doing any kind of electrical DIY, the first step is always to turn the power off before you touch a loose wall outlet or any other device.
✔ Shut off the breaker that feeds that outlet
Go to your breaker panel and look for the breaker that controls that room or outlet. Turn it off. If you are not sure which one it is, it is safer to turn off the main breaker or several possible breakers in that area.
✔ Confirm with a non-contact voltage tester
Turning a breaker off is not enough on its own. Use a non-contact voltage tester at the outlet slots to make sure there is no voltage present before you touch any wires.
If you do not own a voltage tester or are not sure how to use one, this is a good point to stop.
Do not guess when it comes to live power. Leave the outlet unused, label it as unsafe if needed, and wait until you have the right tools or a licensed electrician.
How to Fix a Slightly Loose Wall Outlet (DIY-Friendly)
This section is for slightly loose outlets where:
- The outlet and cover plate move a bit, but there are no burn marks or melted plastic.
- The wiring looks intact, with no obvious damage to insulation.
- You feel comfortable turning off the breaker and using a voltage tester on a loose wall outlet.
1. Gather your tools
- Phillips screwdriver (and/or flathead, depending on your cover plate screws)
- Non-contact voltage tester
- Replacement outlet and/or longer outlet screws or UL-listed spacers
- Electrical tape (optional, for neat finishing on the connections)
2. Remove the cover plate
- Double-check with your voltage tester that the outlet is truly dead.
- Unscrew the cover plate and gently remove it so you can see the outlet and box behind it.
3. Inspect the wiring and connections
- Look for any signs of damage: cracked insulation, burned or discolored plastic, or melted spots on the outlet.
- Check that the copper wires are firmly attached under the screw terminals or properly secured in the back-wire clamps, not barely hanging on.
If you see any burnt spots, melted plastic, or badly damaged insulation, stop right here. That is no longer a simple loose wall outlet fix. Put the cover back on, leave the breaker off for that circuit, and call a licensed electrician.
4. Secure the outlet in the box
- Gently pull the outlet forward just enough to access the mounting ears and screws.
- Tighten the top and bottom screws that hold the outlet to the electrical box until the outlet sits firmly and evenly.
- If the box is recessed behind the wall surface, use UL-listed spacers or longer screws to bring the outlet forward so that it sits solidly behind the cover plate.
The goal is simple: when the cover plate is reinstalled, the loose wall outlet should now feel solid and should not move when you plug something in.
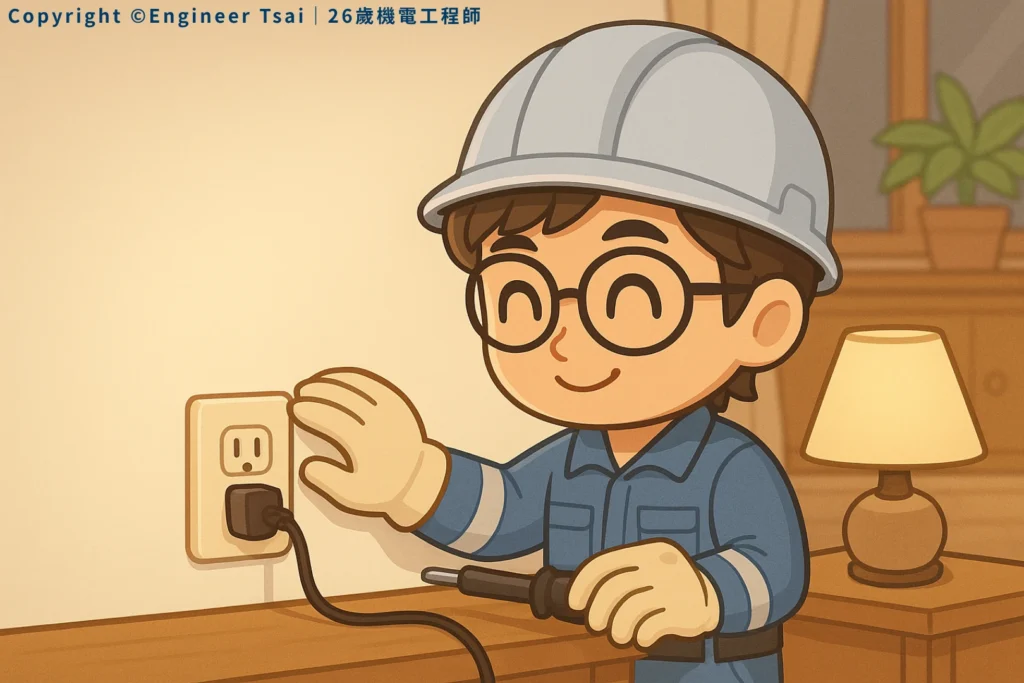
5. Restore power and test
- Carefully tuck the wires back into the box, avoiding sharp bends or pinched insulation, and reinstall the cover plate.
- Turn the breaker back on, plug in a small device (like a lamp or phone charger), and make sure the outlet works normally.
- Gently move the plug up and down to check that the outlet itself no longer wiggles.
Tip:
Every time you reinstall an outlet, give it a gentle shake test. If it moves, it is worth taking one more minute to open it and fix the mounting before calling the loose wall outlet truly repaired.
Common Mistakes to Avoid With Loose Outlets
- Working with the power still on: Thinking that you will be fast or careful is one of the most dangerous habits in electrical work.
- Leaving the mounting screws half tight: The outlet may look like it is back in place, but if it still moves under your hand, the problem is not solved.
- Fixing only the look, not the wiring: Pushing the outlet back and tightening the cover plate without checking the connections can hide a deeper issue like overheating or arcing.
- Using cheap or non-listed parts: For something you use every day, stick with UL-listed outlets and parts from reputable brands.
Simple rule:
You might be able to fix a loose wall outlet yourself, but safety is always the main project. Saving a few minutes is never worth taking on a hidden fire or shock risk.
When You Should Call a Licensed Electrician
The earlier sections covered what you can usually handle yourself. Now let’s look at the situations where fixing a loose wall outlet is not a good DIY project.
- You see obvious burn marks, scorched areas, or melted plastic on or around the outlet.
- The wires inside the box look tangled, brittle, discolored, or you cannot tell how they were originally connected.
- Several outlets or switches in the same area act up together, flicker, or cause frequent breaker trips.
- You do not feel confident identifying hot, neutral, and ground wires.
- The outlet is in a kitchen, bathroom, laundry area, basement, or outdoors, and you are not sure whether it should be a GFCI outlet.
In these cases, calling a licensed electrician is usually the safest and cheapest long-term choice. You are not just paying for a quick fix, but for an expert set of eyes on your wiring.
If you want to go deeper into general electrical safety guidelines before you touch a loose wall outlet, you can also review resources from:
- Electrical Safety Foundation International (ESFI) – Home Electrical Safety
- U.S. Consumer Product Safety Commission – Electrical Safety Center
Cost & Time: How Much to Fix a Loose Outlet in the U.S.?
Here is a rough idea of what it usually takes to fix a loose wall outlet in a typical U.S. home.
- DIY materials: A standard 15A outlet may cost around $2–$5, a GFCI outlet around $15–$25, and spacers or longer screws just a few dollars.
- Tools: Most households already have a basic screwdriver. A non-contact voltage tester is a small one-time investment that you can reuse for many projects.
- Your time: Expect about 10–30 minutes if you move slowly and carefully through the steps.
If you hire a licensed electrician, most areas charge a service call fee plus parts and labor. If the loose wall outlet only needs to be remounted or replaced and the wiring is otherwise fine, the repair is usually straightforward. Many homeowners save money by asking the electrician to inspect and update several older outlets during the same visit.
Conclusion: Be the Safety Gatekeeper for Your Home
You do not have to be a full-time electrician to make your home safer. By learning how to spot, check, and fix a loose wall outlet, you are already taking on an important role in your household.
Next time you notice an outlet that wiggles or does not sit flat, do not just leave it for later. Use this guide to decide whether it is a safe DIY project or a situation for a licensed electrician, and take action either way. Turning a loose wall outlet into a solid, safe one is a small project with a big payoff.
Every small repair you handle responsibly is more than fixing one outlet. It is another layer of protection for your home, your family, and your peace of mind.
📌 Recommended reading on this site:
🔹How to Use a Voltage Tester: Basic Home Electrical Safety
Step-by-step instructions for using a non-contact voltage tester so you can confirm circuits are truly off before you touch anything.
🔹How to Turn Off Your Main Breaker Safely
Learn how to find and shut off the right breaker, and when it makes sense to turn off the main instead.
🔹5 Essential Electrical Tools Every Home Should Have
A simple checklist of tools that make small electrical fixes safer and easier, from voltage testers to screwdrivers.
📌 External safety resources (for extra reading):
🔹Electrical Safety Foundation International (ESFI) – home electrical safety tips and seasonal safety checklists.
🔹U.S. Consumer Product Safety Commission – Electrical Safety Center – official guidance on outlets, cords, and home electrical hazards.
If this guide helped you, feel free to bookmark it, share it with a friend, or leave a comment with your own loose wall outlet repair story. In a future article, we can talk about another common problem: why some light switches keep failing and what that might mean for your wiring.
❓ FAQ: Loose wall outlet questions
Q1: Do I need to fix a loose wall outlet right away?
It is best not to ignore a loose outlet. A slightly loose outlet may still work, but movement can slowly loosen internal connections and increase the risk of overheating, arcing, or damage to the outlet and wiring. Once you notice that the outlet moves when you plug or unplug devices, it is a good idea to plan a repair soon.
Q2: I’m renting. Can I fix a loose outlet myself?
If the outlet is only mildly loose and you are comfortable turning off the breaker, testing with a voltage tester, and tightening screws, you might be able to handle a simple fix. However, in a rental it is usually smarter to take photos, report the problem to your landlord or property manager, and ask whether they want to send their own electrician or approve a repair. That way you avoid responsibility for any hidden issues inside the wall.
Q3: Can I just tape a loose outlet to the wall?
Taping a loose outlet is not a real fix. Tape might hold the cover plate for a while, but it does not secure the outlet to the box or improve the wiring connections. It can also hide signs of trouble such as heat damage or arcing. The correct solution is to secure or replace the outlet so it sits firmly in the box.
Q4: How much does it cost to have an electrician fix a loose outlet?
Costs vary by region, but most electricians charge a service call or trip fee plus parts and labor. If the outlet only needs to be remounted or replaced and the wiring is otherwise fine, the repair is usually straightforward. Many homeowners save money by asking the electrician to inspect and update several older outlets during the same visit.
Q5: When is it definitely not safe to DIY a loose outlet?
Stop and call a licensed electrician if you see burn marks or melted plastic, smell something burnt around the outlet, notice brittle or discolored insulation on the wires, or have several outlets and switches in the same area acting up together. You should also avoid DIY work if you do not have a voltage tester, are not sure how to verify power is off, or are dealing with outlets in wet or damp locations where GFCI protection may be required.
Read next in this topic
- What Is a Short Circuit? 7 Things Every Homeowner Should Know
- Smart Home Energy Management: A Simple Starter Guide for Safer, Cheaper Power at Home
- What Is Electrical Grounding? A Simple Guide to Safer Power at Home
- How to Choose Home Lighting: A Practical Guide from an Engineer Who Learned the Hard Way
- Home Electrical Safety: Turning Off Your Main Breaker Made Simple
- Home Electrical Safety and Power Outage Preparedness: A Practical Guide for U.S. Households
- What to Do When Your Breaker Keeps Tripping at Home
- How to Avoid Electrical Fires When Using Smart Outlets at Home
- From Power Outages to Food Shortages: Hurricane Prep Made Simple
- 6 Common Signs of Electrical Problems in Your Home (And What to Do First)
- Loose Electrical Outlet? Here’s How to Repair It Safely
- Top Mistakes in Home Electrical Setup (and How to Fix Them)
- Do Home Wires Really Wear Out? The Truth About Old House Wiring In The U.S.
- How to Weatherproof Your Home: Windows and Doors Made Easy
- Static Shock in Winter? 5 Causes + 5 Fixes (Home + Clothes)
- Electric Meter Reading Explained (5-Step Guide): What kWh Really Means on Your Bill
- Home Electrical Safety in the AI Era: From Short Circuits to Old Wiring (and Your First 0–3 Months as an Electrician)
- How to Choose an Extension Cord Safely: 5 Rules to Prevent Overheating
- Home Electrical Panel and Outlet Guide: How to Plan Safer Circuits for Your Home
- Same Breaker Keeps Tripping? 7 Real Reasons (Wattage, Inrush, Loose Connections)

